Metallic Epoxy Flooring Melbourne: The Complete Guide (2026)

Family owned & operated · Melbourne & surrounds · Call us free: +61 485 031 001
Metallic Epoxy Flooring Melbourne: The Complete Guide (2026)

Metallic Epoxy Flooring Melbourne: The Complete Guide (2026)

Back to Blog

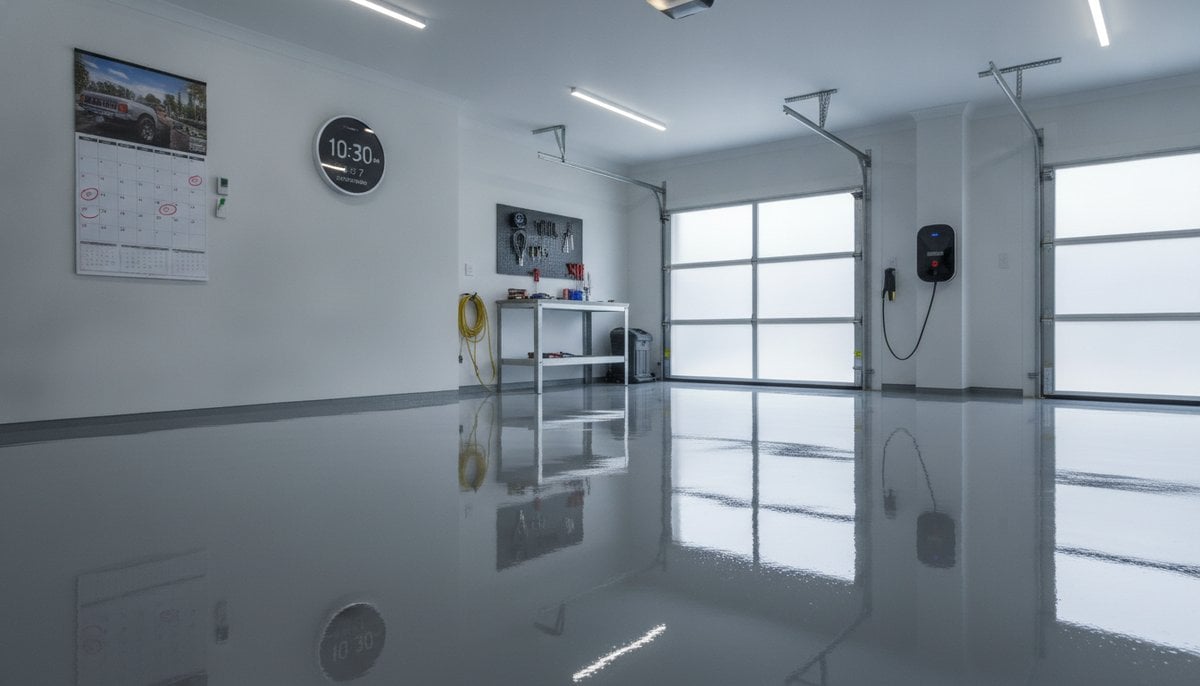
Metallic epoxy flooring has moved from commercial showrooms into Melbourne residential garages at pace over the past few years. The appeal is obvious: a seamless, high-gloss floor with flowing 3D patterns that looks like liquid marble or polished stone and is unlike anything else you can do to a concrete slab. This complete guide covers everything Melbourne homeowners need to know about metallic epoxy in 2026 , how it works, what it costs, how it’s installed, and whether it suits your space.

Key takeaways

  • Metallic epoxy costs $100–$160 per m² installed in Melbourne, or $4,000–$6,400 for a standard double garage.
  • Every metallic epoxy floor is unique , patterns are created freehand and can’t be replicated exactly.
  • It suits showpiece spaces: feature garages, home gyms, studios, and commercial showrooms.
  • For working garages with heavy daily vehicle use, epoxy flake is more practical and costs less.
  • Properly installed with a polyaspartic topcoat, metallic epoxy lasts 10–20 years in residential settings.

What is metallic epoxy flooring?

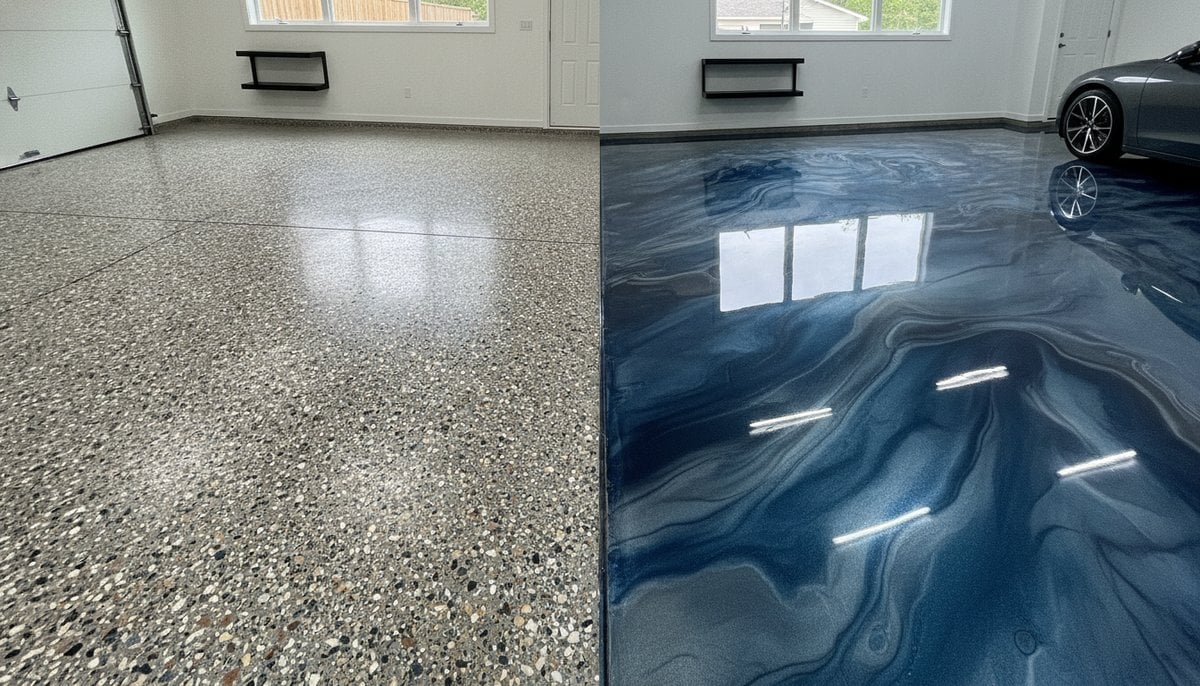
Metallic epoxy is a two-component, 100% solids epoxy system infused with metallic or pearlescent pigment powders. When a skilled installer applies the wet epoxy, they manipulate it using trowels, squeegees, rollers, and in some techniques a leaf blower or heat gun to create flowing, abstract patterns. The metallic particles move through the resin as it self-levels, producing rippling, three-dimensional effects that catch light from multiple angles.

The result is completely unique to each floor. Two garages done by the same installer in the same colour will look different from each other because the manipulation is done freehand during the working time of the material. No digital print or manufactured product can produce the same depth of effect.

How metallic epoxy is different from standard epoxy

Metallic epoxy Standard epoxy / epoxy flake
Visual effect Flowing 3D patterns, liquid marble Solid colour or chip-textured finish
Uniqueness Every floor is one-of-a-kind Consistent, replicable appearance
Installation skill High , requires experienced applicator Moderate
Cost per m² $100–$160 $60–$120
Slip resistance Moderate (smooth surface) Good (chip texture) to excellent
Hides imperfections Moderately Very well (flake covers variation)

Metallic epoxy cost in Melbourne: 2026 pricing

Metallic epoxy flooring in Melbourne costs between $100 and $160 per m² installed, including surface preparation, primer, metallic epoxy base coat, and a polyaspartic or polyurethane topcoat.

Space Approx. area Estimated cost
Single garage 18–24 m² $1,800–$3,840
Double garage 36–44 m² $3,600–$7,040
Home gym or studio 25–40 m² $2,500–$6,400
Commercial showroom 60–150 m² $6,000–$24,000

The price range reflects variation in design complexity, colour selection, and preparation requirements. A simple single-colour metallic with a clean slab sits toward the lower end. A multi-colour design with extensive blending and manipulation on a slab requiring significant prep sits toward the upper end.

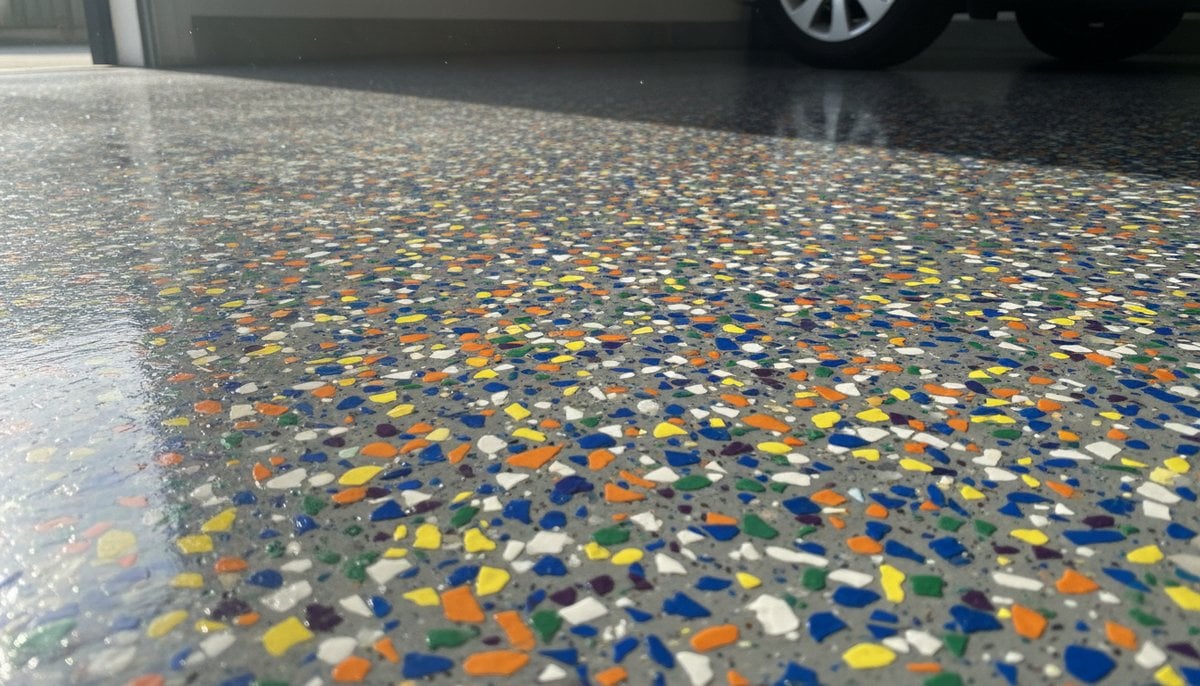
Popular metallic epoxy colours and effects for Melbourne garages

The most popular colour directions for Melbourne residential garages in 2026:
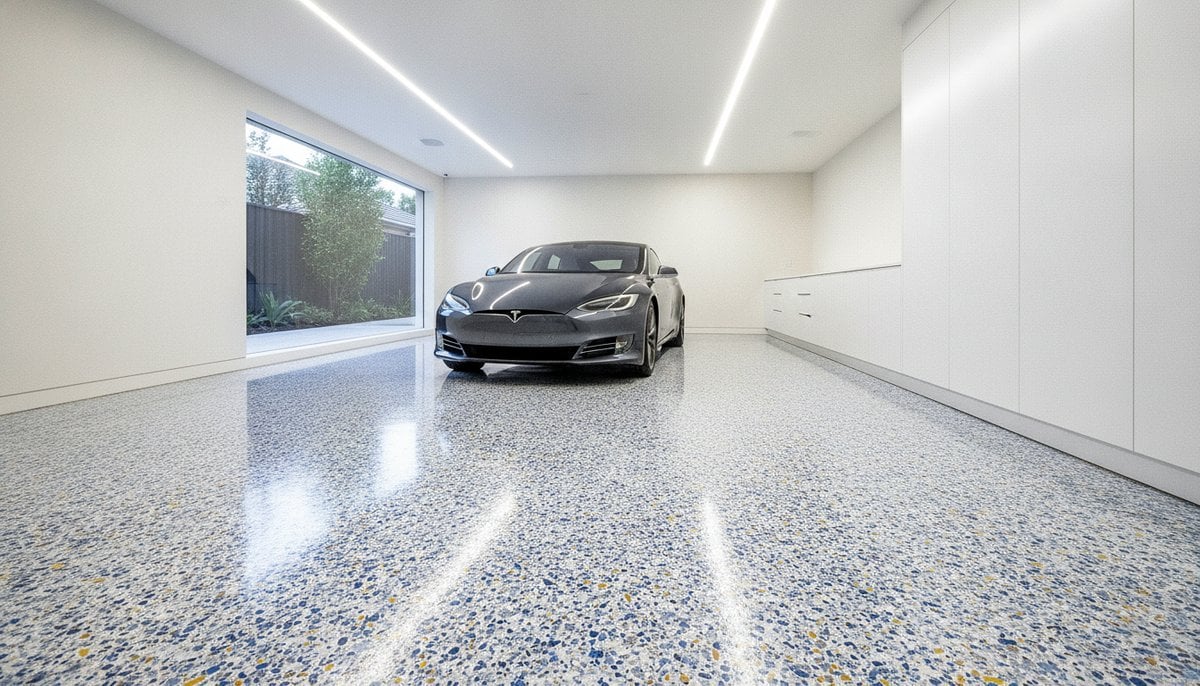
Charcoal and silver

The most popular combination for feature garages. Dark charcoal base with silver metallic creates a deep, moody floor that photographs exceptionally well and complements dark cabinetry and modern garage interiors.

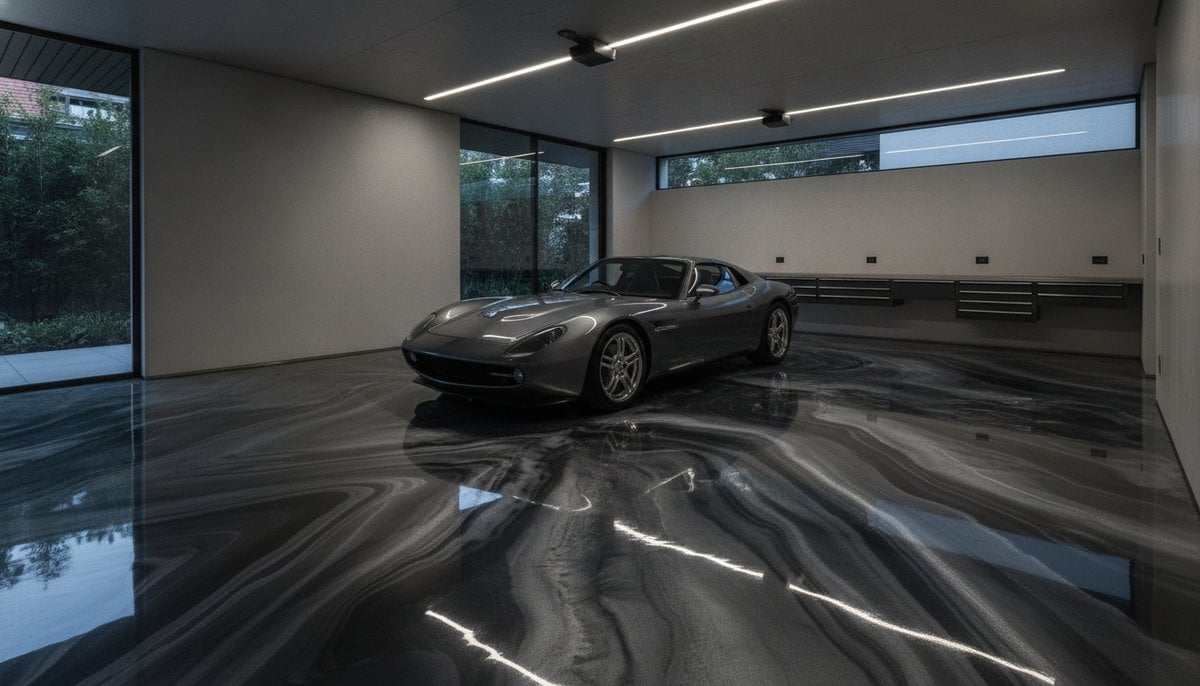
Deep blue and bronze

A bold combination popular in home gyms and collector’s garages. The bronze catches light dramatically against the deep blue base, creating a floor that looks different at every time of day.

Warm grey and gold

A more neutral option that suits garages attached to contemporary homes with warm interior palettes. Less dramatic than charcoal/silver but more versatile as a background for the rest of the space.

Pearl white and silver

A light, bright option that maximises the reflective quality of the metallic system. Popular in showrooms and spaces where maximum light bounce is desired. Requires excellent concrete prep as imperfections show more on light-coloured floors.

Copper and black

An increasingly popular industrial-luxe combination. Copper tones create warmth against a black base and work well in spaces with raw steel or timber elements.

You can see examples of these finishes and more on the Metal and Flake metallic epoxy page.

How metallic epoxy is installed: the process
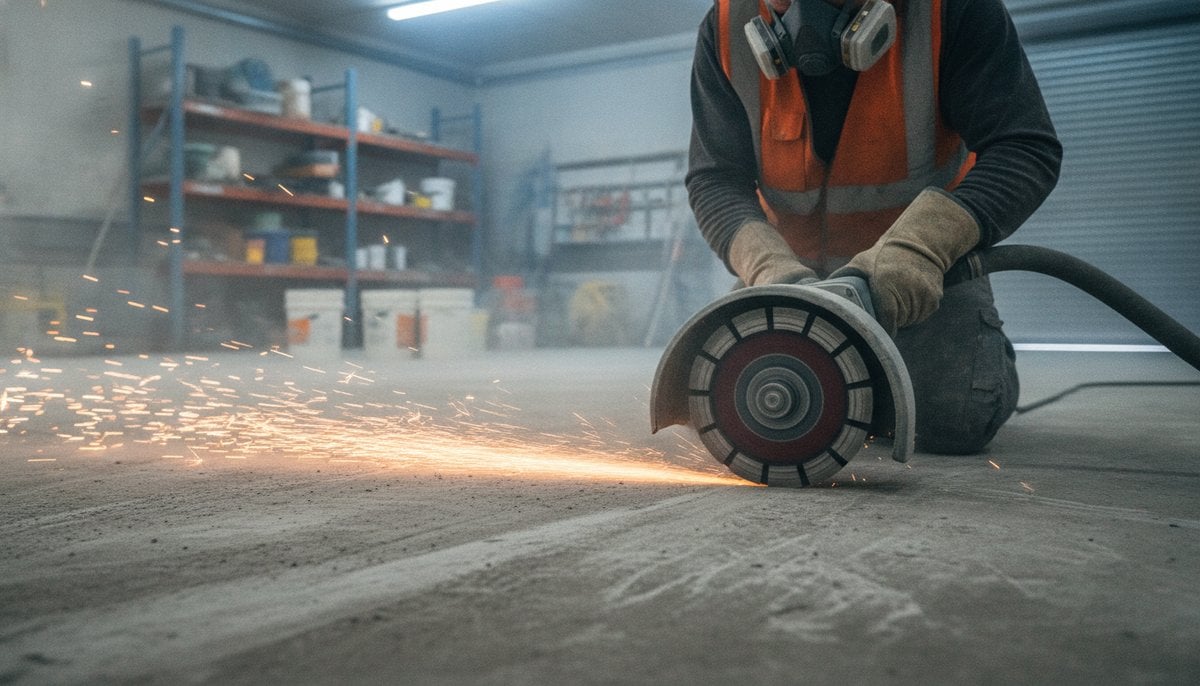
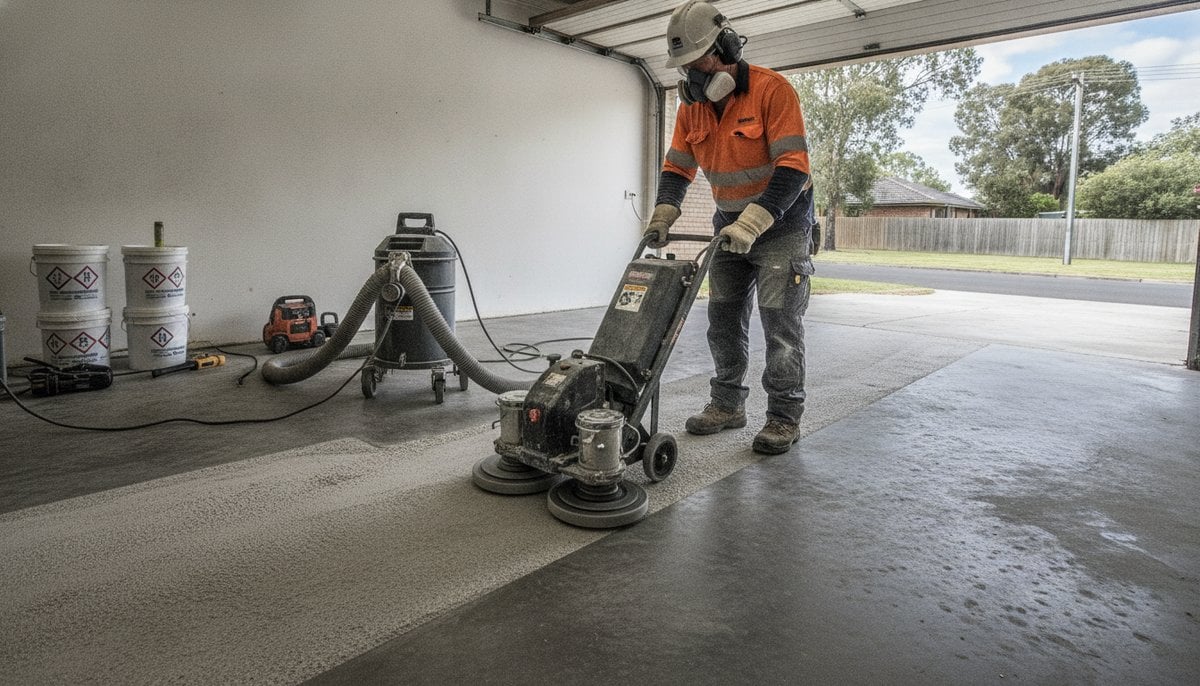
Day 1: preparation

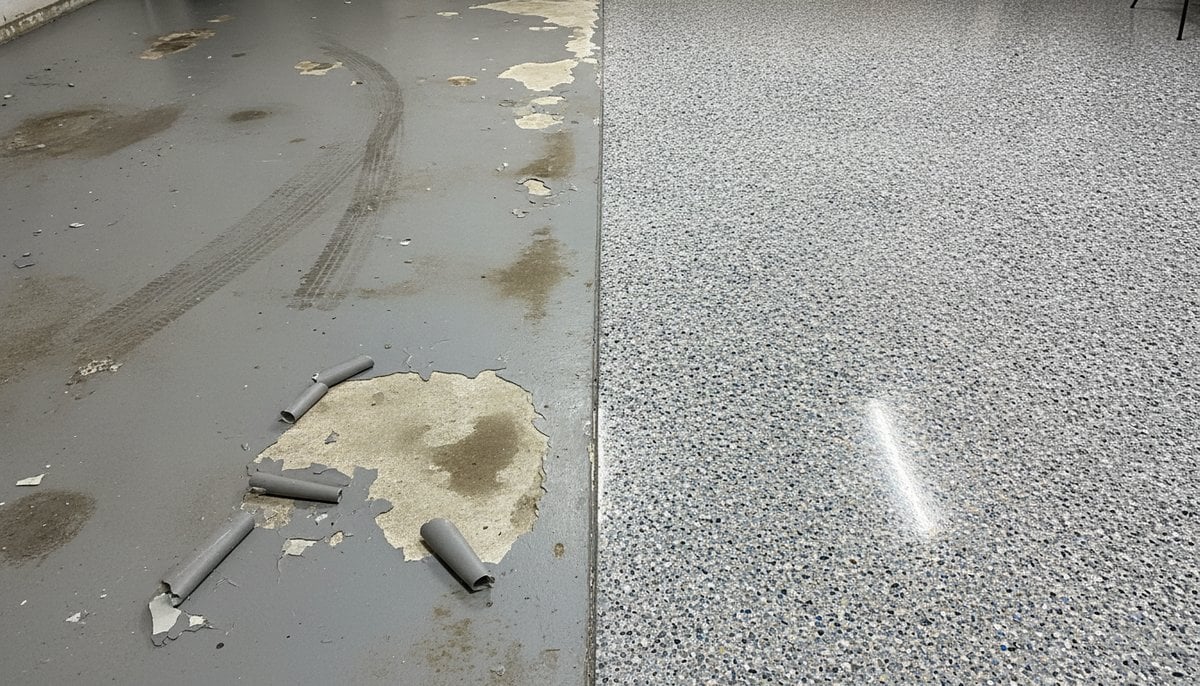
As with all epoxy systems, preparation is the foundation. The installer diamond-grinds the slab to CSP 2–3, fills cracks, treats oil contamination if present, and applies a penetrating primer. No shortcuts here , metallic epoxy is less forgiving of surface variation than flake systems, so prep quality matters even more.

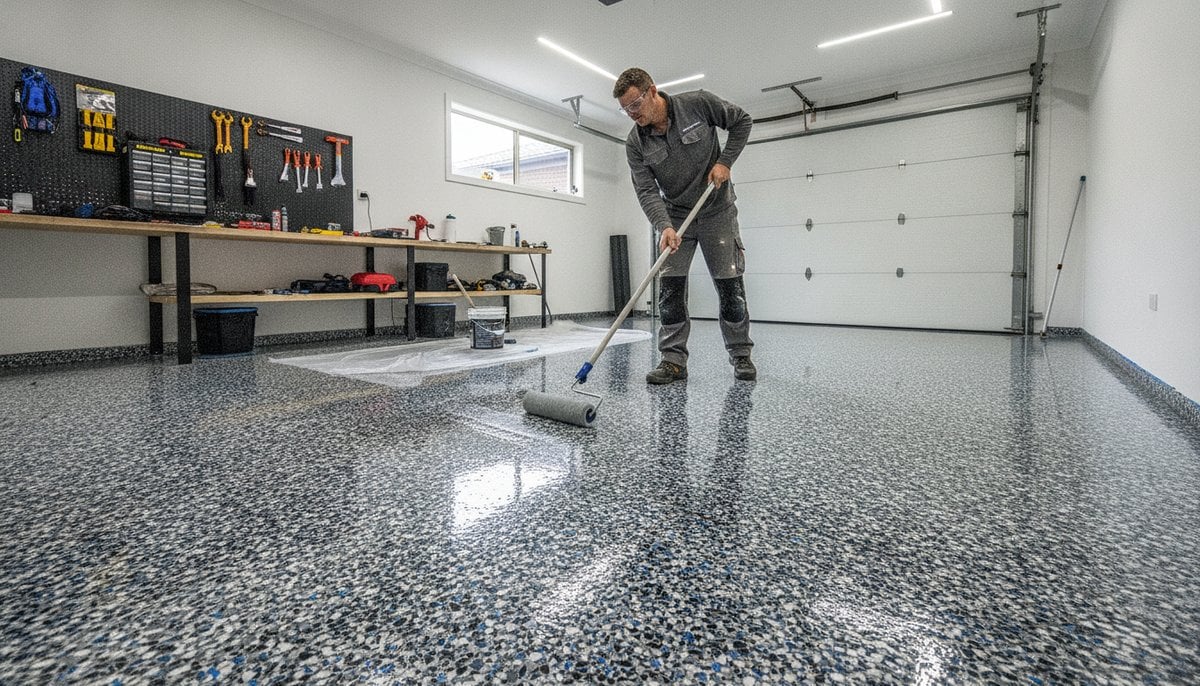
Day 1 (continued): metallic base coat

The metallic epoxy is mixed and applied to the floor in sections. While the epoxy is still wet and workable, the installer manipulates it using a combination of back-rolling, drag techniques, and in some applications a leaf blower or heat gun to push the metallic particles into flowing patterns. This is the artistic phase , it requires skill, speed, and a clear design intent before the material sets.

Day 2: topcoat

After overnight cure, the installer applies a clear polyaspartic or polyurethane topcoat. This seals the metallic layer, provides chemical and UV protection, and creates the high-gloss surface finish. On garage floors, a fine anti-slip aggregate is recommended in the topcoat to prevent the smooth surface becoming slippery when wet.

Slip resistance: the most important practical consideration

A metallic epoxy floor without an anti-slip additive in the topcoat can be slippery when wet. In a Melbourne garage that sees rain, condensation, or wet shoes, this is a real safety concern. Always confirm with your installer that an anti-slip aggregate will be added to the topcoat. This reduces the mirror-finish slightly but keeps the floor safe. Any reputable installer will include this as standard for garage applications.

Is metallic epoxy suitable for your Melbourne garage?

Metallic epoxy is the right choice for garages that are as much about appearance as function. The ideal application is a showpiece space , a collector’s garage, a home gym, a photography studio, or a space where the floor itself is part of the design intent.

For a working garage used daily for parking, mechanical work, or general storage with high foot traffic and vehicle use, epoxy flake is a more practical choice. It’s less expensive, more slip-resistant by nature, hides surface wear better, and is just as durable.

The choice isn’t about quality , both systems are professional and long-lasting. It’s about function versus showpiece.

Maintenance: keeping your metallic epoxy floor looking its best

Metallic epoxy is low-maintenance but not zero-maintenance. To keep it looking showroom-fresh:

  • Sweep or vacuum regularly to remove grit that can scratch the topcoat
  • Mop with a pH-neutral cleaner diluted in water , avoid acidic or abrasive cleaners
  • Wipe oil and chemical spills promptly, especially petrol and brake fluid
  • Use felt pads under heavy items to prevent scratching
  • Consider a topcoat maintenance coat every 5–7 years in high-use applications to restore the gloss

The metallic layer itself is sealed beneath the topcoat and is not affected by surface wear , only the topcoat wears. A worn topcoat can be refreshed without redoing the entire floor.

How to find a qualified metallic epoxy installer in Melbourne

Metallic epoxy requires significantly more skill than standard epoxy application. The patterns are created freehand with no ability to correct once the epoxy starts setting. Before hiring anyone, ask to see completed metallic epoxy projects , not renders or stock photos, but actual installed floors they’ve done. Look for consistency in the pattern, clean edges, and a uniform gloss finish.

A qualified installer will also ask you questions: about the space, the aesthetic you want, whether you need anti-slip, and what colour direction suits your garage. If they quote without asking anything, they’re not thinking about your specific result.

FAQ: metallic epoxy flooring Melbourne

How much does metallic epoxy flooring cost in Melbourne?

Between $100 and $160 per m² installed in 2026, including preparation and topcoat. A standard double garage costs $3,600–$7,040 depending on design complexity and slab condition.

How long does metallic epoxy last?

10–20 years in residential settings with proper preparation and a quality topcoat. The topcoat is the wear surface and can be refreshed at the 5–10 year mark if needed, without redoing the full system.

Can metallic epoxy be applied over tiles?

No. Tiles must be removed and the concrete prepared before any epoxy system is applied. Epoxy bonds to concrete, not to ceramic or porcelain surfaces.

What is the difference between metallic epoxy and polished concrete?

Polished concrete is ground and refined to create a smooth, aggregate-exposed finish. It has a natural, stone-like appearance. Metallic epoxy is a coating applied to concrete that creates an entirely different visual effect , flowing patterns, deep gloss, and customisable colour. Polished concrete costs a similar amount but doesn’t offer the same colour and pattern flexibility.

Can I choose my own pattern?

You can choose colour direction and general style (subtle vs dramatic, flowing vs structured), but the exact pattern is created during installation and will always be slightly different from any reference image. This is part of what makes the floor unique.

See metallic epoxy in person before you decide

The best way to decide if metallic epoxy is right for your Melbourne garage is to see it installed. Metal and Flake can show you examples of recent completed projects and walk you through colour options for your specific space. Book a free consultation and quote here.

Ready for a Floor That Lasts?

Get a free, no-obligation quote from Melbourne’s trusted epoxy specialists.

Get a Free Quote
+61 485 031 001

How Long Does Epoxy Garage Floor Installation Take in Melbourne?

Family owned & operated · Melbourne & surrounds · Call us free: +61 485 031 001
How Long Does Epoxy Garage Floor Installation Take in Melbourne?

How Long Does Epoxy Garage Floor Installation Take in Melbourne?

Back to Blog

If you’re planning to get an epoxy garage floor installed in Melbourne, one of the first practical questions is: how long will the garage be out of action? The answer depends on the system, your concrete condition, and the weather. This guide gives you real timelines so you can plan properly.

Key takeaways

  • Most Melbourne garage epoxy jobs take 1–2 days to install.
  • You can walk on the floor after 24 hours. Vehicle use starts at 5–7 days (or 24 hours with a polyaspartic topcoat).
  • Full chemical cure , when the floor reaches maximum hardness , takes 28–30 days, though it’s fully functional well before that.
  • Melbourne winters slow cure times slightly due to lower temperatures.
  • Cold weather (under 10°C) can prevent epoxy from curing correctly , most installers won’t coat in these conditions.

Day-by-day: what happens during a standard epoxy installation

Day 1: preparation and base coat

The installer arrives, clears any remaining items, and begins diamond grinding the concrete. For a standard double garage (40 m²), grinding takes 3–5 hours. After grinding, cracks are filled and the floor is vacuumed thoroughly. A primer coat goes down in the afternoon, followed by the epoxy base coat. On flake systems, the coloured chips are broadcast into the wet base coat. The installer leaves the floor to cure overnight.

Day 2: topcoat

The following morning, the installer returns to inspect the base coat, scrape back any loose flake (on flake systems), and apply the clear polyurethane or polyaspartic topcoat. This coat typically takes 2–4 hours to apply including edges. The installer leaves and the floor begins its initial cure.

After day 2: cure timeline

  • 24 hours: light foot traffic. You can walk on the floor carefully.
  • 48–72 hours: light use. You can move items back into the garage on foot.
  • 5–7 days: vehicle use. Safe to park a car. Don’t do burnouts.
  • 28–30 days: full chemical cure. The floor reaches maximum hardness and chemical resistance.

Does a polyaspartic topcoat change the timeline?

Yes, significantly. A polyaspartic topcoat cures much faster than standard polyurethane. Some polyaspartic systems allow light vehicle use within 24 hours of the final coat. If you need your garage back quickly , for example, if it’s your only parking and you can’t leave the car on the street for a week , ask your installer about a polyaspartic topcoat option.

The tradeoff is a 15–25% cost premium, but for many Melbourne homeowners the convenience is worth it.

What affects the installation timeline?

Concrete condition

A slab that needs significant crack repair, oil treatment, or moisture remediation adds time to day one. A badly damaged or contaminated slab could add half a day to the preparation phase. This is why an in-person quote matters , a professional can assess how much prep time your specific floor needs.

Garage size

A single garage (20 m²) can often be ground and coated in a single long day. A large triple garage or workshop may require two full days of preparation before the coating phase even starts. Your installer will advise on the schedule when they quote.

Melbourne’s temperature and weather

Epoxy cures through a chemical reaction that’s sensitive to temperature and humidity. The ideal range is 15–30°C with low humidity. In Melbourne’s winter months (June–August), overnight temperatures can drop to 5–10°C, which slows or prevents epoxy from curing correctly. Most professional installers won’t apply standard epoxy when temperatures will drop below 10°C during the cure window.

If you’re planning an installation in winter, discuss timing with your installer. Some may schedule for days forecast to stay above 12–15°C, or recommend a polyaspartic system which has a wider acceptable temperature range.

Number of coats

A basic two-coat system (primer plus topcoat) can sometimes be completed in one day. A full flake system with primer, base coat, flake broadcast, and topcoat is always a two-day job. A metallic epoxy system with multiple manipulation passes may also extend into a second full day depending on complexity.

What to do to prepare for installation day

  • Clear the garage completely before the installer arrives , vehicles, shelving, stored items, all of it
  • Arrange alternative parking for at least 7 days (or 24–48 hours if using a polyaspartic topcoat)
  • Keep children and pets out of the garage during installation and for the first 24 hours after
  • Ensure the garage is ventilated , open windows or side doors if possible during application
  • Check the weather forecast: avoid booking installation if temperatures are forecast below 12°C during the cure window

FAQ: epoxy garage floor installation time Melbourne

Can the epoxy be applied in a single day?

A basic two-coat system on a small, well-prepared slab can sometimes be done in one long day. A standard flake or metallic system on a double garage is almost always a two-day job due to cure time between the base coat and topcoat.

How long after installation can I park my car?

With a standard polyurethane topcoat: 5–7 days. With a polyaspartic topcoat: 24 hours. The floor will feel hard much sooner, but vehicle tyres generate heat and weight that the floor needs to be fully bonded to handle safely.

What if it rains during installation?

Rain isn’t an issue for an enclosed garage. What matters is temperature and humidity. High humidity (above 85%) during application can cause epoxy to blush , a cloudy surface finish. Professional installers monitor conditions and will reschedule if necessary rather than apply in conditions that compromise the result.

Can the installation be done over a weekend?

Yes. Many Melbourne installers offer weekend bookings. Day one on Saturday, day two on Sunday, light foot traffic Monday. Vehicle use by the following weekend.

Ready to book your Melbourne garage floor?

Metal and Flake complete most residential garage installations in two days and provide a clear cure timeline so you know exactly when you can use your floor. Book a free on-site quote across Melbourne and get a confirmed installation schedule before any work begins.

Ready for a Floor That Lasts?

Get a free, no-obligation quote from Melbourne’s trusted epoxy specialists.

Get a Free Quote
+61 485 031 001

Do You Need to Grind Concrete Before Epoxy Flooring? A Melbourne Installer Answers

Family owned & operated · Melbourne & surrounds · Call us free: +61 485 031 001
Do You Need to Grind Concrete Before Epoxy Flooring? A Melbourne Installer Answers

Do You Need to Grind Concrete Before Epoxy Flooring? A Melbourne Installer Answers

Back to Blog

The short answer is yes , if you want the epoxy to last. Grinding concrete before epoxy flooring is not a premium add-on or an optional extra. It’s the single most important step in the whole installation process. This post explains why, what happens when it’s skipped, and how to tell whether your installer is doing it properly.

Key takeaways

  • Diamond grinding creates the mechanical bond between epoxy and concrete. Without it, most floors fail within 1–3 years.
  • Acid etching is not an equivalent substitute for grinding on Melbourne residential slabs.
  • Grinding removes oil contamination, old coatings, and the weak surface layer of concrete.
  • A properly ground floor feels like 40–60 grit sandpaper , slightly rough but uniform.
  • Any installer who skips grinding or substitutes acid etching is cutting a corner that will cost you later.

Why epoxy needs a prepared concrete surface

Epoxy doesn’t work like paint. Paint air-dries on whatever surface you apply it to. Epoxy undergoes a chemical reaction that produces a cross-linked polymer , and for that polymer to adhere permanently, it needs to grip into the pores of the concrete at a mechanical level.

New, untouched concrete usually has a smooth trowelled surface. The pores are partially closed. Concrete that’s been sealed or coated has the pores blocked entirely. Oil-contaminated concrete has a layer of hydrocarbons that physically prevents bonding. In all these cases, epoxy applied without preparation will delaminate , sometimes within weeks, almost always within 2 years.

Grinding solves all of these problems at once. It opens the pores, removes contamination, strips old coatings, and creates a uniform rough profile (called CSP , Concrete Surface Profile) that gives the epoxy something to grip.

What is diamond grinding?

Diamond grinding uses a machine fitted with diamond-tipped segments to shave the top 1–2mm off the concrete surface. The diamonds are embedded in metal bonds and rotate at high speed across the floor, producing a consistent, controlled profile. Professional installers use walk-behind grinders for open floor areas and angle grinders with diamond cups for edges and corners.

The process generates a significant amount of concrete dust, which is why professional equipment includes dust shrouds connected to industrial vacuums. A correctly set up grinding job produces very little visible dust , most is captured at the point of generation.

What profile should the concrete be ground to?

The target for most residential epoxy systems is CSP 2–3 on the International Concrete Repair Institute scale. CSP 2 looks and feels like fine sandpaper. CSP 3 is slightly rougher. Either profile provides enough mechanical key for standard epoxy flake or metallic epoxy systems.

Grinding too aggressively (CSP 4–5) creates too much surface profile and can cause pinholes in thinner coating systems. Grinding too lightly (CSP 1) doesn’t open the pores adequately. A skilled installer knows the right machine settings and diamond grit for your specific slab.

Can you use acid etching instead of grinding?

Acid etching (applying diluted hydrochloric or muriatic acid to the concrete) is sometimes offered as a cheaper preparation alternative. It does open concrete pores to some degree on new, clean, uncoated slabs. But it fails in the most common Melbourne garage scenarios:

Slab condition Diamond grinding Acid etching
New, clean, porous concrete Works well Adequate
Trowelled hard finish Works well Inadequate
Oil or grease contamination Works well Does not remove oil
Previous paint or sealer Removes it Cannot remove it
Old failed epoxy Removes it Cannot remove it
Aged or hardened concrete Works well Inadequate bond profile

Melbourne garages are typically older slabs with some combination of oil staining, a previous coating, and a trowelled finish. Acid etching is not appropriate for most of them. If an installer quotes you a price that seems unusually low and mentions acid etching rather than grinding, that’s why , and it’s a risk to the floor’s longevity.

What happens if grinding is skipped?

The failure pattern is consistent: the floor looks excellent for 6–18 months. Then delamination starts, usually at the edges first or around the entry point where foot traffic concentrates. Chips or bubbles appear. Within 2–3 years the floor needs to be stripped and redone , at full cost again, plus the cost of grinding out whatever is left of the failed coating.

The grinding that should have been done the first time now has to be done anyway, plus remediation of the failed epoxy. Skipping preparation is never actually cheaper in the long run.

How to check if your installer is grinding properly

You don’t need to be on-site during grinding to verify it was done. After prep and before the epoxy goes down, look at the concrete surface:

  • It should look uniformly lighter in colour than the original slab , grinding removes the surface skin and exposes fresh concrete aggregate
  • It should feel like rough sandpaper, not smooth
  • Any oil stains should be reduced or gone
  • Old paint should be removed, not just scuffed

If the floor still looks shiny, smooth, or has visible oil patches, preparation was not adequate. Raise this with the installer before the epoxy goes down , not after.

FAQ: concrete grinding before epoxy Melbourne

Does every garage floor need to be ground before epoxy?

Yes, for any professional system designed to last 10+ years. The only exception might be brand-new, perfectly clean, highly porous concrete , but even then, grinding produces a better result than etching alone.

How much does concrete grinding add to the cost?

Grinding is typically included in a professional epoxy quote rather than being a separate line item. If you see a quote that itemises grinding at $15–$25/m², that’s normal and expected. A quote with no mention of preparation at all is missing a critical component.

Can I rent a grinder and do it myself?

Hire centres do rent concrete grinders. However, achieving a consistent CSP 2–3 profile without experience is difficult, and inadequate grinding still leads to adhesion failure. Preparing the floor incorrectly yourself doesn’t reduce the risk , it just means the failure is on your account rather than the installer’s. For a floor you’re investing $3,000–$5,000 in, professional preparation is worth it.

How long after grinding before epoxy can be applied?

Usually the same day or the next morning. The ground surface should be clean, dry, and free of dust. Some installers prime the same day as grinding; others wait until the following morning to ensure any residual moisture from the vacuum process has dissipated.

Talk to a Melbourne installer who grinds every floor

Metal and Flake diamond grind every garage floor before installation as standard , not as an upgrade. If you want a floor that lasts 10–20 years rather than 2–3, start with the right preparation. Book a free on-site quote across Melbourne and see exactly what’s included before you commit.

Ready for a Floor That Lasts?

Get a free, no-obligation quote from Melbourne’s trusted epoxy specialists.

Get a Free Quote
+61 485 031 001

How to Prepare a Garage Floor for Epoxy: A Melbourne Installer Guide

Family owned & operated · Melbourne & surrounds · Call us free: +61 485 031 001
How to Prepare a Garage Floor for Epoxy: A Melbourne Installer Guide

How to Prepare a Garage Floor for Epoxy: A Melbourne Installer Guide

Back to Blog

The most common reason epoxy garage floors fail in Melbourne isn’t the epoxy itself , it’s the preparation. A floor that peels within two years is almost always a preparation problem: insufficient grinding, inadequate crack repair, or moisture that wasn’t addressed before the coating went down. This guide walks through exactly how to prepare a garage floor for epoxy the right way, from what a professional does on day one to what you should check before signing any quote.

Key takeaways

  • Surface preparation accounts for around 80% of an epoxy floor’s longevity.
  • Diamond grinding is the industry standard for Melbourne residential slabs , acid etching is not a substitute.
  • Oil contamination, moisture, and existing coatings must all be addressed before epoxy goes down.
  • A concrete profile of CSP 2–3 (equivalent to 40–60 grit sandpaper) is the target for most residential epoxy systems.
  • If a quote doesn’t specify the preparation method, ask before you sign anything.

Why preparation matters more than the epoxy itself

Epoxy bonds to concrete through mechanical adhesion , it literally grips the microscopic pores and profile of the concrete surface. If those pores are closed (trowelled concrete), contaminated (oil, paint, curing compound), or wet (moisture transmission), the epoxy can’t form a proper bond. It looks fine for a few months, then starts delaminating from the edges or blistering in patches.

This is why experienced Melbourne installers spend more time on preparation than on applying the actual coating. A double garage typically takes 4–6 hours to grind, clean, and repair , compared to 1–2 hours to roll out the epoxy coats.

Step 1: Clear the garage completely

Everything needs to come out. Vehicles, shelving units, garden equipment, stored boxes. Installers need full access to every corner and along all edges. Built-in cabinetry that can’t be moved will need the epoxy cut in carefully around it, which takes more time and is reflected in the quote.

Step 2: Inspect and assess the slab

Before grinding starts, a professional installer will inspect the concrete for:

  • Cracks: hairline cracks, structural cracks, and control joint cracks all need different treatment
  • Oil and chemical contamination: common in working garages; requires degreasing and sometimes grinding out the contaminated layer
  • Existing coatings: old paint, sealer, or failed epoxy must be removed entirely
  • Moisture: a plastic sheet taped to the slab overnight reveals moisture transmission , if condensation forms underneath, the moisture needs addressing first
  • Spalling or surface damage: pitting, aggregate exposure, or delamination of the top concrete layer

This inspection shapes what additional prep work is required beyond standard grinding. A good installer tells you what they find , not what you want to hear.

Step 3: Diamond grinding

Diamond grinding is the non-negotiable foundation of professional epoxy preparation in Melbourne. A walk-behind or handheld diamond grinder with the appropriate grit removes the top layer of concrete, opens the pores, removes contamination, and creates the surface profile (roughness) needed for epoxy to bond.

What profile are they grinding to?

Concrete Surface Profile (CSP) is a standardised measure of surface roughness. For most residential epoxy systems, the target is CSP 2–3 , roughly equivalent to 40–60 grit sandpaper. This is coarse enough for mechanical bonding but not so rough that it creates pinholes in the coating.

Why not acid etching instead?

Acid etching (using muriatic or hydrochloric acid to open concrete pores) is a cheaper alternative used by some DIYers and budget installers. It works on new, uncontaminated concrete in moderate condition. It does not work on:

  • Concrete with a trowelled hard finish (very common in Melbourne garages)
  • Contaminated concrete (oil, grease, old paint)
  • Concrete that has been previously sealed or coated
  • Older slabs with surface hardening

Diamond grinding works on all of these. For Melbourne residential garages, grinding is the correct method.

Step 4: Crack repair

After grinding, cracks are more visible and can be properly assessed. The repair method depends on the crack type:

  • Hairline cracks (under 1mm): filled with a low-viscosity epoxy filler that wicks into the crack under gravity
  • Medium cracks (1–5mm): routed out into a consistent channel, filled with semi-rigid polyurea crack filler, and feathered flush
  • Structural or moving cracks: addressed differently , a moving crack filled with rigid epoxy will reopen. Flexible filler or a saw-cut control joint approach is used instead

Crack repair adds cost but it’s not optional. An unfilled crack telegraphs through the finished floor and will eventually allow moisture ingress that undermines adhesion.

Step 5: Oil and contamination treatment

Oil staining is extremely common in Melbourne garage floors. If a car has ever dripped oil or if the garage was used as a workshop, the concrete has absorbed hydrocarbons that prevent epoxy from bonding.

Treatment options include:

  • Degreasing: a commercial alkaline degreaser applied, scrubbed, and rinsed before grinding
  • Grinding through the contamination: grinding deep enough to remove the stained concrete layer entirely
  • Oil-tolerant primer: some professional primer systems are formulated to penetrate and bond through minor residual contamination , but this is a last resort, not a substitute for proper degreasing

Step 6: Moisture check

Melbourne’s clay soils and older slab construction mean moisture transmission is common, particularly in ground-floor garages. A slab that appears dry on the surface can have significant vapour transmission when tested properly.

Professional methods include a calcium chloride test or in-situ relative humidity test. A simple but effective field test is taping a sheet of plastic to the concrete for 16–24 hours , if moisture condenses underneath, the slab has active vapour transmission.

High moisture levels require a moisture-tolerant primer or a moisture barrier coat before the epoxy base coat. Installing standard epoxy over a wet slab without addressing this leads to blistering.

Step 7: Final vacuum and tack

After grinding and repair, the floor is vacuumed thoroughly to remove all concrete dust. Any remaining dust acts as a bond-breaker. Some installers also blow out corners and edges with compressed air. The floor should be completely clean and dry before primer is applied.

What to look for in a professional preparation

When getting quotes for an epoxy garage floor in Melbourne, ask these questions:

  • Do you use diamond grinding or acid etching for prep?
  • What CSP profile do you grind to?
  • Is crack filling included, or quoted separately?
  • How do you handle oil contamination?
  • Do you test for moisture before applying primer?

A professional installer will answer these questions without hesitation. An evasive or vague answer is a signal to get another quote.

FAQ: preparing a garage floor for epoxy Melbourne

How long does preparation take for a standard double garage?

A standard double garage (40 m²) takes 4–6 hours of preparation including grinding, crack filling, and cleaning. This is typically done on day one, with primer and base coat applied the same day or the following morning.

Can I prepare my own floor before an installer arrives?

You can clear the garage and degrease obvious oil spots. However, the grinding must be done by the installer with professional equipment , a hired angle grinder is not a substitute for a walk-behind diamond grinder. Let the professional handle everything from the grinding stage.

What if my garage floor has old paint on it?

Old paint must be removed entirely before epoxy is applied. Diamond grinding will remove most paint coatings. If the paint is thick or multiple layers deep, additional grinding passes or a chemical stripper may be required. Epoxy applied over existing paint will fail.

Does preparation cost extra?

Quality installers include standard preparation (grinding, basic crack fill) in their base quote. Additional work for significant oil contamination, structural cracking, or moisture remediation is typically quoted separately once the slab is inspected in person.

Book a free assessment for your Melbourne garage

The best way to know what preparation your slab needs is to have a professional look at it. Metal and Flake offer free on-site assessments and quotes across Melbourne, with a written breakdown of what preparation is required before any epoxy flake or metallic epoxy system goes down. Book your free quote here.

Ready for a Floor That Lasts?

Get a free, no-obligation quote from Melbourne’s trusted epoxy specialists.

Get a Free Quote
+61 485 031 001

Epoxy Flake vs Polyaspartic Coating for Melbourne Garages: What Is the Difference?

Family owned & operated · Melbourne & surrounds · Call us free: +61 485 031 001
Epoxy Flake vs Polyaspartic Coating for Melbourne Garages: What Is the Difference?

Epoxy Flake vs Polyaspartic Coating for Melbourne Garages: What Is the Difference?

Back to Blog

If you’ve been getting quotes for your Melbourne garage floor, you’ve probably heard both “epoxy flake” and “polyaspartic” mentioned , sometimes by the same installer for different parts of the job. They’re related but different products, and understanding what each one does will help you ask better questions and get a better floor. Here’s the plain-English breakdown.

Key takeaways

  • Epoxy flake is the decorative base system. Polyaspartic is typically used as the topcoat over it.
  • A full polyaspartic system (base and topcoat) can be installed in a single day and driven on within 24 hours.
  • A traditional epoxy flake system takes 2 days and needs 5–7 days before vehicle use.
  • Polyaspartic is 100% UV stable. Epoxy yellows under direct sunlight without a UV-stable topcoat.
  • Polyaspartic systems cost 15–25% more but suit garages needing fast turnaround or heavy sun exposure.

What is epoxy flake flooring?

Epoxy flake uses a two-part epoxy resin as the base coat, into which coloured acrylic chips are broadcast. A clear topcoat (polyurethane or polyaspartic) is then applied over the chips to seal everything in. The chips provide colour, texture, and slip resistance. The system is the most popular decorative garage floor option in Melbourne because it’s durable, looks great, and suits virtually any concrete slab in reasonable condition.

Standard epoxy base coats take 12–24 hours to cure between coats, so a typical installation spans two days. Vehicle use is restricted for 5–7 days while the system reaches full cure strength.

What is polyaspartic coating?

Polyaspartic is a type of polyurea , a next-generation coating chemistry that cures much faster than epoxy and offers superior UV stability. In garage floor systems, polyaspartic is used in two ways:

  • As a topcoat over an epoxy flake base: the most common use. The epoxy provides the thick, bonded base layer and the flake decoration. The polyaspartic topcoat provides UV protection, fast final cure, and a harder wearing surface.
  • As a full system (base and topcoat): some installers offer a 100% polyaspartic system where both the base coat and topcoat are polyaspartic. This allows single-day installation and same-day or next-day vehicle use.

Side-by-side comparison

Epoxy flake + poly topcoat Full polyaspartic system
Installation time 2 days 1 day
Vehicle use 5–7 days 24 hours
UV stability Good (with polyaspartic topcoat) Excellent
Cost premium Base +15–25%
Thickness/build Thicker, more forgiving Thinner, requires flawless prep
Temperature sensitivity Moderate Works in wider temp range
Long-term durability 10–20 years 10–20 years

UV yellowing: why it matters for Melbourne garages

Standard epoxy resins yellow under UV exposure. A garage with a window, a translucent roof panel, or an open door that lets in direct sun will see an epoxy floor yellow and fade over time. This doesn’t affect performance, but it does affect appearance.

Polyaspartic coatings are aliphatic (UV-stable) by chemistry. They don’t yellow. This is why most quality installers use a polyaspartic topcoat over an epoxy flake base regardless of the system , it protects the floor’s appearance for the long term. A full polyaspartic system extends this UV resistance through every layer.

If your Melbourne garage faces north or gets significant natural light, UV stability is worth prioritising.

Cure time: when can you use your garage again?

This is often the deciding factor for homeowners. A traditional epoxy flake system means your garage is out of action for up to a week. For families who park daily or use the garage as a workspace, that’s disruptive.

A polyaspartic system, or an epoxy flake system with a polyaspartic topcoat, significantly reduces the wait. With a full polyaspartic system, some installers can have you parking on the floor within 24 hours of installation. If turnaround time matters, ask your installer specifically what topcoat they use and what the cure timeline is.

Which system is right for your Melbourne garage?

Choose epoxy flake with a polyaspartic topcoat if:

  • You want the best balance of cost and performance
  • You can manage 5–7 days without the garage
  • Your slab has minor surface variation (epoxy base hides it better)

Choose a full polyaspartic system if:

  • You need the garage back within 24 hours
  • The garage gets significant direct sunlight
  • Melbourne’s temperature swings are a concern (polyaspartic works in a wider curing temperature range)
  • You’re prepared to pay the 15–25% premium for these advantages

FAQ: epoxy flake vs polyaspartic Melbourne

Is polyaspartic better than epoxy?

Not categorically. They serve different purposes. The most popular professional system in Melbourne combines epoxy as the base (for thickness and bond strength) with polyaspartic as the topcoat (for UV stability and fast cure). “Better” depends on your priorities.

Does polyaspartic cost more than epoxy?

A full polyaspartic system costs roughly 15–25% more than a standard epoxy flake system. For a double garage, that’s typically an extra $500–$1,200. The premium buys faster cure time and better UV performance.

How long does a polyaspartic floor last?

A professionally installed polyaspartic system lasts 10–20 years, similar to a quality epoxy system. The polyaspartic chemistry is slightly harder and more abrasion-resistant, which can extend topcoat life in high-traffic applications.

Can I get an epoxy flake look with a polyaspartic system?

Yes. Flake chips are broadcast into the polyaspartic base coat just as they are with epoxy. The decorative result looks identical. The difference is in the chemistry underneath and the cure timeline, not the finished appearance.

Get expert advice for your Melbourne garage floor

Whether you’re leaning toward a standard epoxy flake system or a faster-curing polyaspartic option, Metal and Flake can walk you through the right choice for your slab and timeline. Book a free on-site quote across Melbourne.

Ready for a Floor That Lasts?

Get a free, no-obligation quote from Melbourne’s trusted epoxy specialists.

Get a Free Quote
+61 485 031 001

Epoxy Coating vs Garage Floor Paint: What Melbourne Homeowners Need to Know

Family owned & operated · Melbourne & surrounds · Call us free: +61 485 031 001
Epoxy Coating vs Garage Floor Paint: What Melbourne Homeowners Need to Know

Epoxy Coating vs Garage Floor Paint: What Melbourne Homeowners Need to Know

Back to Blog

Garage floor paint is cheap and easy to apply. Epoxy coating costs more and takes longer. But if you’re weighing up the two for your Melbourne garage, the decision isn’t really about upfront cost , it’s about what you want the floor to do in five years’ time. This guide explains the real differences so you can choose the right option for your situation.

Key takeaways

  • Garage floor paint costs $15–$35 per m² (or less DIY). Epoxy coating costs $60–$120 per m² installed.
  • Floor paint lasts 2–4 years under normal garage use. Epoxy lasts 10–20 years.
  • Paint sits on the surface. Epoxy bonds chemically into the concrete pores.
  • Hot tyres, oil, and chemicals will destroy floor paint within months. Epoxy resists all three.
  • On a per-year cost basis, epoxy is significantly cheaper than repainting every few years.

Cost comparison: epoxy vs floor paint

Garage floor paint Professional epoxy coating
Cost per m² $15–$35 (professional) / $5–$12 (DIY) $60–$120
Double garage upfront $600–$1,400 professional / $200–$480 DIY $2,400–$4,800
Expected lifespan 2–4 years 10–20 years
Cost over 20 years (double garage) $3,000–$14,000 (repainting 5–10 times) $2,400–$4,800 (once)

Over a 20-year window, floor paint often costs more than a single epoxy installation , before you factor in the time and disruption of repainting every 2–3 years.

What is garage floor paint?

Garage floor paint is a water-based acrylic or latex coating that air-dries on the surface of the concrete. It doesn’t bond chemically with the concrete , it sits on top like a layer of regular wall paint. It’s easy to apply with a roller, dries quickly, and is available from any hardware store for $40–$80 per tin.

The problem is that concrete floors take heavy abuse: vehicle tyres, dropped tools, oil and chemical spills, moisture, and the grinding action of foot traffic carrying grit. Floor paint isn’t formulated to handle any of these well. It starts peeling, chipping, and staining within 12–24 months under normal garage use.

What is epoxy coating?

Epoxy is a two-part coating system (resin plus hardener) that chemically bonds into the prepared concrete surface. It cures into a hard, thick, plastic-like film that is resistant to vehicle tyres, oil, chemicals, abrasion, and moisture. Unlike paint, it doesn’t just sit on top , it penetrates and bonds mechanically into the concrete pores after diamond grinding.

Professional epoxy systems use 100% solids commercial-grade product. DIY epoxy kits from hardware stores use water-based epoxy with around 50% solids , better than paint, but significantly less durable than a professional system. The epoxy flake systems installed by Metal and Flake use commercial-grade product with a polyaspartic or polyurethane topcoat.

The key difference: surface bonding vs chemical bonding

This is the most important thing to understand. Floor paint air-dries. It doesn’t react with the concrete , it just sticks to the surface like paint on a wall. Concrete is porous and constantly expanding and contracting with temperature changes. Paint can’t keep up, so it cracks, peels, and lifts.

Epoxy resin and hardener mix together and undergo a chemical reaction that produces a cross-linked polymer. When applied to properly prepared (ground) concrete, this polymer bonds into the pores of the slab at a mechanical level. It becomes part of the floor rather than a coating sitting on top of it. That’s why it lasts 10–20 years instead of 2–4.

Hot tyres: the most common cause of paint failure

Hot tyre pickup is the biggest killer of garage floor coatings. When you park a car after driving, the tyres are warm. If the coating has limited heat resistance, the tyre surface bonds slightly to the floor. When the car drives off, it pulls the coating away with it , leaving bare patches within months.

Floor paint has essentially no hot tyre resistance. DIY water-based epoxy has limited resistance. Professional commercial-grade epoxy, with a proper topcoat, is specifically formulated to resist hot tyre contact. If you park vehicles in your garage, this distinction matters a great deal.

Oil and chemical resistance

Melbourne garages regularly see engine oil, brake fluid, petrol, degreasers, and cleaning chemicals. Floor paint absorbs these. Oil stains are nearly impossible to remove from painted concrete, and some chemicals actively break down the paint film.

Epoxy is chemically resistant. Oil and most common garage chemicals bead on the surface and wipe off cleanly. The topcoat (polyurethane or polyaspartic) provides an additional chemical barrier over the epoxy base.

Can you paint over epoxy, or epoxy over paint?

You can paint over epoxy, but there’s rarely a good reason to. If your epoxy floor is worn, a professional can assess whether a topcoat refresh is appropriate.

You cannot epoxy over existing paint. The paint needs to be fully removed (usually by grinding) before epoxy can be applied. If someone tells you they can epoxy over your painted floor without grinding it off first, that’s a red flag , the epoxy won’t bond to paint and will fail quickly.

When floor paint is the right choice

Despite the performance gap, there are situations where paint makes sense:

  • You’re a renter and need a temporary improvement
  • The garage is purely for storage with no vehicle use
  • You’re selling the property soon and want a quick cosmetic refresh
  • Budget is extremely tight and you accept you’ll need to redo it in 2–3 years

For a garage that parks vehicles, sees regular use, or is part of a home you plan to stay in for years, paint is a false economy. The disruption of repainting every few years costs more in time and money than investing in epoxy once.

FAQ: epoxy vs garage floor paint Melbourne

Can I apply epoxy myself instead of paint?

DIY epoxy kits exist, but they use water-based product with lower solids content than professional systems. Without diamond grinding, the adhesion is also compromised. DIY epoxy is better than paint but won’t last as long as a professional installation. For a floor you want to last 10+ years, professional installation is worth it.

How long does epoxy take to dry vs paint?

Paint dries in 1–4 hours and can be walked on the same day. Epoxy takes 24 hours before light foot traffic and 5–7 days before vehicle use (or as little as 24 hours with a polyaspartic topcoat). The longer cure is a one-time inconvenience for a floor that lasts 10–20 years.

Will floor paint peel if I park my car on it?

Almost certainly, within 1–2 years. Hot tyre pickup and the mechanical stress of tyres rolling on painted concrete are the most common causes of failure. If you’re parking a car, epoxy is the appropriate solution.

Does epoxy look better than painted concrete?

Significantly. A plain painted floor looks like painted concrete. An epoxy flake system or metallic epoxy looks like a showroom floor. The visual upgrade is one of the main reasons Melbourne homeowners choose epoxy.

Get a free quote for your Melbourne garage

If you’re ready to stop repainting and invest in a floor that lasts, Metal and Flake offer free on-site quotes across Melbourne. Book your free measure and quote here.

Ready for a Floor That Lasts?

Get a free, no-obligation quote from Melbourne’s trusted epoxy specialists.

Get a Free Quote
+61 485 031 001

Epoxy Flake vs Metallic Epoxy: Which Is Right for Your Melbourne Garage?

Family owned & operated · Melbourne & surrounds · Call us free: +61 485 031 001
Epoxy Flake vs Metallic Epoxy: Which Is Right for Your Melbourne Garage?

Epoxy Flake vs Metallic Epoxy: Which Is Right for Your Melbourne Garage?

Back to Blog

Epoxy flake and metallic epoxy are the two most popular premium garage floor systems in Melbourne right now. They’re made differently, look completely different, and suit different spaces. If you’re trying to decide between them, this guide cuts through the noise with a straight-up comparison on cost, appearance, durability, and which one actually suits a working Melbourne garage.

Key takeaways

  • Epoxy flake costs $80–$120/m². Metallic epoxy costs $100–$160/m².
  • Flake gives a textured, multi-colour chip finish. Metallic gives a smooth, liquid-marble 3D effect.
  • Flake has better natural slip resistance. Metallic can be slippery when wet unless an anti-slip additive is used.
  • For a working garage with daily vehicle use, flake is the more practical choice.
  • For a showpiece floor in a gym, studio, or feature garage, metallic is worth the premium.

At a glance: epoxy flake vs metallic epoxy

Epoxy flake Metallic epoxy
Cost per m² $80–$120 $100–$160
Double garage (40 m²) $3,200–$4,800 $4,000–$6,400
Visual style Speckled chip finish, granite-like Flowing liquid marble, 3D depth
Slip resistance Excellent (textured surface) Moderate (smooth unless additive used)
Hides concrete imperfections Very well Moderately
UV stability Good with polyaspartic topcoat Good with polyaspartic topcoat
Installation complexity Moderate High (requires artistry)
Best for Working garages, gyms, laundries Feature garages, studios, showrooms

What is epoxy flake flooring?

Epoxy flake flooring uses coloured acrylic chips broadcast into a wet epoxy base coat, then sealed with a clear polyurethane or polyaspartic topcoat. The chips and called flakes or vinyl chips , come in dozens of colour blends and can be broadcast at different densities. A full broadcast (100% coverage) gives a solid chip finish with no base colour visible. A partial broadcast lets the base colour show through for a speckled effect.

The texture of the chips creates natural slip resistance, which is why flake is the default choice for Melbourne garage floors where water, oil, or wet shoes are common. You can see the full range on the Metal and Flake flake system page.

What is metallic epoxy flooring?

Metallic epoxy uses a pigmented epoxy base coat that contains metallic powder or pearlescent pigments. During application, the installer manipulates the wet epoxy using trowels, rollers, and sometimes a leaf blower to create flowing, abstract patterns with depth and movement. The result looks like liquid marble, polished stone, or a 3D fluid art piece depending on the colour and technique.

No two metallic epoxy floors look exactly the same. The patterns are created freehand during installation, which is why it requires more skill and time than flake. This is also why it costs more. See examples of metallic finishes on the Metal and Flake metallic epoxy page.

Cost: how big is the price gap?

Metallic epoxy consistently costs $20–$40 per m² more than epoxy flake. On a standard double garage (40 m²), that’s a $800–$1,600 difference. The gap comes from two places: more expensive metallic pigment materials, and more labour-intensive installation that requires a skilled applicator to create the patterns correctly.

For most Melbourne homeowners, the flake system delivers a premium result at a lower price. The metallic premium makes sense when you want a truly unique, one-off floor that becomes a design feature of the space.

Slip resistance: an important practical difference

In a working garage, slip resistance matters. Water from Melbourne’s rainy winters, oil drips, and wet tyre tracks all create slip hazards on smooth surfaces.

Epoxy flake has inherent slip resistance because the acrylic chips create texture on the surface. A professional installer can also add a fine anti-slip aggregate to the topcoat for additional grip.

Metallic epoxy produces a very smooth, high-gloss surface. It can become slippery when wet. A reputable installer should offer to add an anti-slip additive to the topcoat for garage applications. If you’re choosing metallic for a garage, ask specifically about this.

Which hides concrete imperfections better?

Most Melbourne residential slabs have some history , minor cracking, surface pitting, old paint, or oil staining. Both systems require crack repair and grinding before installation, but the flake broadcast does a better job of disguising residual surface variation after prep.

Metallic epoxy is more revealing. The flowing pattern and high-gloss finish can draw attention to slight surface irregularities that a chip finish would simply absorb. If your slab is in rough condition, flake is the safer choice for a consistent final result.

Durability: are they equally long-lasting?

Both systems, when installed correctly with proper preparation and a quality topcoat, last 10–20 years in a residential garage. The topcoat is the wear surface, not the decorative layer underneath, so durability is more about topcoat quality and preparation than which system you choose.

The practical difference: scratches and scuffs show more on a smooth metallic floor than on a textured flake floor. In a garage used for automotive work, heavy equipment, or anything that might drag across the floor, flake is more forgiving day-to-day.

Which system suits your space?

Choose epoxy flake if:

  • Your garage sees regular vehicle use, oil drips, or wet conditions
  • You have kids or dogs using the garage
  • Your concrete has significant surface variation
  • Budget is a consideration
  • You want a durable, easy-care floor that looks great without being precious about it

Choose metallic epoxy if:

  • The garage is a showpiece , a man cave, gym, studio, or collector’s garage
  • You want a unique, one-of-a-kind floor that’s a design feature
  • The space has controlled access and won’t see heavy daily abuse
  • You want maximum visual impact and the budget supports it

FAQ: epoxy flake vs metallic epoxy Melbourne

Is metallic epoxy worth the extra cost for a Melbourne garage?

If the garage is a feature space rather than a working garage, yes. The visual result is genuinely stunning and unlike anything else you can do to a concrete floor. For a standard working garage, the extra cost is harder to justify when epoxy flake delivers excellent results at a lower price.

Can metallic epoxy be made slip-resistant?

Yes. Ask your installer to add an anti-slip aggregate to the topcoat. This slightly reduces the mirror-finish look but makes the floor safe for wet conditions. Always request this for garage applications.

Which system is harder to install?

Metallic epoxy requires significantly more skill. The patterns are created freehand and can’t be corrected once the epoxy starts to set. This is why you should only have metallic epoxy installed by an experienced applicator, not a general trades person who also does epoxy.

Can I combine both systems?

Some installers offer hybrid designs, such as a metallic base with a light flake broadcast to add texture. It’s not common but it’s possible if you want elements of both.

Talk to a Melbourne epoxy specialist

The best way to decide is to see both systems in person. Metal and Flake install both epoxy flake and metallic epoxy across Melbourne and can show you samples on your actual concrete. Get in touch to book a free consultation and quote.

Ready for a Floor That Lasts?

Get a free, no-obligation quote from Melbourne’s trusted epoxy specialists.

Get a Free Quote
+61 485 031 001

Epoxy vs Tiles for Your Melbourne Garage Floor: A Real Cost Comparison

Family owned & operated · Melbourne & surrounds · Call us free: +61 485 031 001
Epoxy vs Tiles for Your Melbourne Garage Floor: A Real Cost Comparison

Epoxy vs Tiles for Your Melbourne Garage Floor: A Real Cost Comparison

Back to Blog

Should you epoxy your Melbourne garage floor or tile it? Both are common upgrades, but they work very differently, cost differently, and suit different situations. This comparison covers real cost, durability, installation, and maintenance so you can make the right call for your garage before spending a cent.

Key takeaways

  • Epoxy flooring costs $60–$120 per m² installed. Interlocking garage tiles cost $30–$60 per m² supplied and installed.
  • Tiles are cheaper upfront but typically last 5–10 years. A professional epoxy floor lasts 10–20 years.
  • Epoxy bonds directly to concrete. It’s seamless, waterproof, and easier to clean.
  • Tiles are a better option for garages with known moisture issues, since air can circulate beneath vented tiles.
  • For most Melbourne homeowners, epoxy delivers better value over the life of the floor.

Cost comparison: epoxy vs tiles for a Melbourne garage

Epoxy flooring Interlocking garage tiles
Cost per m² (installed) $60–$120 $30–$60
Single garage (20 m²) $1,200–$2,400 $600–$1,200
Double garage (40 m²) $2,400–$4,800 $1,200–$2,400
Expected lifespan 10–20 years 5–10 years
Cost per year (double garage) $150–$320 $170–$480

When you factor in lifespan, the per-year cost of epoxy and tiles is actually similar and epoxy wins if you’re comparing professional-grade systems over a 15-year window.

What are interlocking garage tiles?

Interlocking garage tiles (also called modular floor tiles) are rigid polypropylene panels that click together over your existing concrete. They don’t require adhesive or professional installation. Most homeowners can tile a double garage in half a day. Vented designs allow air to circulate beneath the surface, which helps in garages with moisture coming up through the slab.

The tradeoff is that tiles sit on top of the concrete rather than bonding to it. They can shift, trap grit underneath, and the interlocking joints collect oil and debris over time. They also don’t look as clean or seamless as an epoxy flake floor.

What is epoxy garage flooring?

Epoxy is a chemically bonded multi-layer coating system applied directly to concrete. The installer diamond-grinds the slab, applies a primer, one or more epoxy base coats, and seals it with a polyurethane or polyaspartic topcoat. The result is a seamless, hard, glossy surface that bonds mechanically into the concrete pores.

Because it’s bonded rather than floating, epoxy doesn’t shift, lift, or trap debris underneath. It’s also resistant to oil, chemicals, and hot tyre marks , all common in Melbourne garages.

Durability: which lasts longer?

A professional epoxy floor installed with proper preparation lasts 10–20 years in a residential Melbourne garage. Interlocking tiles last 5–10 years before they start cracking, fading from UV exposure, or developing loose joints that trip people up.

The main durability risk for epoxy is poor preparation: a floor installed without diamond grinding will start delaminating at the edges within 2–4 years. For tiles, the risk is buying thin, low-density polypropylene that cracks under vehicle weight.

Which handles Melbourne’s climate better?

Melbourne’s climate throws temperature swings, damp winters, and occasional extreme heat at garage floors. Here’s how each option responds:

Moisture

Moisture coming up through a concrete slab (called vapour transmission) is the enemy of bonded coatings. If your slab has significant moisture issues, epoxy can blister and delaminate if a moisture barrier isn’t applied first. Vented interlocking tiles sidestep this problem entirely because they float above the concrete and air circulates underneath. For garages known to have rising damp, tiles may be the safer short-term solution or get the moisture issue addressed before laying epoxy.

Temperature and UV

A polyaspartic topcoat handles Melbourne’s UV exposure well. Standard polyurethane topcoats are also UV-stable. Polypropylene tiles can fade and become brittle with prolonged UV exposure, particularly in north-facing garages. Some tile brands are rated for UV, so check the spec sheet before buying.

Hot tyres

Hot tyre pickup where a tyre’s heat bonds to the floor coating and peels it when the car drives off , is a real issue with thin floor paints and DIY epoxy kits. Professional commercial-grade epoxy systems are formulated to resist it. Polypropylene tiles are generally resistant to hot tyres because the plastic doesn’t bond to rubber.

Installation: what’s involved for each?

Epoxy installation

Professional epoxy installation takes 1–2 days for a double garage. Day one is preparation (grinding, crack filling, priming) and the base coat. Day two is the topcoat. Cure time is 24 hours before foot traffic and 5–7 days before vehicle use. You need to clear the garage completely and won’t have access during that window.

Tile installation

Interlocking tiles take 3–5 hours for a double garage. You can do it yourself, and the garage can usually be used the same day. Tiles need to be cut around edges and obstacles, which requires a jigsaw or utility knife depending on the material.

Cleaning and maintenance

Epoxy is the clear winner here. A seamless surface with no joints means there’s nowhere for oil, grit, or dirt to accumulate. A mop and a mild degreaser handles most messes. The only maintenance required is an occasional machine buff if the topcoat starts to dull after many years.

Tiles collect debris in their joints. Oil and brake fluid seep into the gaps and stain the concrete underneath. To clean properly, you often need to remove sections of tile to access the concrete beneath, which defeats part of the convenience argument.

Appearance: which looks better?

This is subjective, but most Melbourne homeowners who see both options side-by-side choose epoxy for the finished look. A full-broadcast epoxy flake floor or a metallic epoxy system looks like a showroom floor. Interlocking tiles look like what they are: a plastic mat over concrete.

Tiles have improved significantly and some patterns do look clean and modern. But they can’t match the seamless, high-gloss finish of a professionally installed epoxy system.

When tiles are the right choice

Despite epoxy being the better long-term option for most Melbourne garages, tiles make sense in specific situations:

  • You’re renting and can’t make permanent changes to the floor
  • Your slab has severe moisture issues that need to be fixed before any bonded coating
  • You need the garage back in use within hours and can’t wait for epoxy to cure
  • Budget is very tight and you want a temporary upgrade while saving for epoxy

FAQ: epoxy vs tiles for Melbourne garages

Is epoxy cheaper than tiles for a garage floor?

Epoxy costs more upfront ($60–$120/m² vs $30–$60/m² for tiles), but lasts twice as long. Over a 10-year window the total cost is often similar, and epoxy wins on per-year value over 15+ years.

Can I install epoxy over tiles?

No. Tiles need to be removed before epoxy is applied. Epoxy bonds to bare concrete, not to a tiled surface.

Do interlocking tiles damage garage concrete?

No. They sit on top without adhesive and can be removed without leaving any residue. They’re a fully reversible option.

Which is better for a Melbourne garage used daily?

Epoxy. For a garage that sees daily vehicle use, oil drips, and foot traffic, a professional epoxy system handles the workload better than tiles over the long term.

Get a free epoxy quote for your Melbourne garage

If you’re leaning toward epoxy, the next step is getting an accurate quote based on your actual concrete. Metal and Flake offer free on-site quotes across Melbourne with a full written breakdown. Book your free quote here.

Ready for a Floor That Lasts?

Get a free, no-obligation quote from Melbourne’s trusted epoxy specialists.

Get a Free Quote
+61 485 031 001

How Much Does Epoxy Flake Flooring Cost Per m² in Melbourne?

Family owned & operated · Melbourne & surrounds · Call us free: +61 485 031 001
How Much Does Epoxy Flake Flooring Cost Per m² in Melbourne?

How Much Does Epoxy Flake Flooring Cost Per m² in Melbourne?

Back to Blog

Epoxy flake flooring costs between $80 and $120 per m² installed in Melbourne in 2026. That’s the short answer. The longer answer depends on your slab size, concrete condition, the density of flake broadcast, and whether you need a standard polyurethane topcoat or a faster-curing polyaspartic finish. This guide breaks it all down so you can budget accurately before you call anyone.

Key takeaways

  • Epoxy flake flooring costs $80–$120 per m² installed in Melbourne.
  • A double garage (40 m²) typically runs $3,200–$4,800 all in.
  • The price includes diamond grinding, primer, epoxy base coat, flake broadcast, and clear topcoat.
  • Concrete condition is the main price variable. A problem slab adds $200–$1,500 to the quote.
  • Full-broadcast flake (100% coverage) costs slightly more than a partial broadcast but hides concrete imperfections better.

Epoxy flake flooring cost per m² in Melbourne: quick reference

Job size Approx. floor area Estimated cost
Single garage 18–24 m² $1,500–$2,900
Double garage 36–44 m² $3,200–$4,800
Triple garage 55–65 m² $4,400–$7,200
Workshop or warehouse 100+ m² $8,000–$14,000+

All estimates include surface preparation, flake system installation, and topcoat. Prices are for the Melbourne metro area in 2026.

What is epoxy flake flooring and why does it cost what it does?

Epoxy flake flooring uses coloured acrylic chips broadcast into a wet epoxy base coat, then sealed with a clear polyurethane or polyaspartic topcoat. The result is a durable, slip-resistant surface with a speckled finish that’s popular for Melbourne garages, gyms, laundries, and commercial showrooms.

The cost is higher than plain epoxy for two reasons: the additional material (flakes plus a dedicated clear topcoat) and the extra labour involved in broadcasting the flake evenly and scraping back the excess before sealing. A full-broadcast floor, where chips cover 100% of the surface, uses more flake material than a partial broadcast and takes longer to install correctly.

You can explore the full range of flake colours and finishes on the Metal and Flake flake system page.

What affects the price of epoxy flake flooring in Melbourne?

Concrete preparation

Diamond grinding is not optional. It opens the concrete surface so the epoxy bonds at a mechanical level rather than just sitting on top. If your slab has a trowelled hard finish, a previous paint or sealer, or oil contamination, preparation takes longer. Grinding typically adds $15–$25 per m² to the base rate and is always included in a quality quote.

Broadcast density

A full-broadcast flake floor uses roughly 300–500g of flake chips per m². A partial broadcast uses 100–200g. Full broadcast costs slightly more in materials but produces a more consistent finish and better hides minor concrete imperfections. Most Melbourne residential garages use full broadcast.

Topcoat choice

A standard polyurethane topcoat is durable, cost-effective, and adds $8–$12/m² to the job. A polyaspartic topcoat cures faster (light traffic in hours rather than days), handles UV exposure better, and is slightly more flexible. It adds $15–$25/m² but is worth considering if your garage gets direct sunlight or if you need the space back quickly.

Slab condition

Cracks, spalling, oil stains, or moisture transmission all add scope. Minor crack repairs typically cost $80–$200. A badly damaged slab or one with significant moisture issues can add $500–$1,500 before the epoxy goes down. A good installer will identify these at quoting stage and price them clearly rather than adding surprises to the invoice.

Epoxy flake vs other flooring options: cost comparison

Flooring type Cost per m² (installed) Expected lifespan
Epoxy flake $80–$120 10–20 years
Plain epoxy $60–$90 8–15 years
Garage floor tiles (interlocking) $30–$60 5–10 years
Floor paint $15–$35 2–4 years
Polished concrete $80–$150 20+ years

On a cost-per-year-of-service basis, epoxy flake compares well against most alternatives. Floor paint is cheaper upfront but typically needs reapplication every 2–3 years. Polished concrete lasts longer but costs as much or more and doesn’t provide the same slip resistance out of the box.

FAQ: epoxy flake flooring cost per m² Melbourne

How much does epoxy flake flooring cost per m² in Melbourne?

Installed epoxy flake flooring costs $80–$120 per m² in Melbourne in 2026. The range is driven by slab condition, broadcast density, and topcoat type. A full-broadcast flake floor with a polyaspartic topcoat sits toward the top of that range.

Is epoxy flake flooring cheaper than metallic epoxy?

Yes. Epoxy flake flooring runs $80–$120/m² while metallic epoxy systems typically cost $100–$160/m². Metallic epoxy is more labour-intensive to install and uses more specialist materials, which is why it carries a higher price. See our full epoxy cost guide for a detailed comparison.

Does the price include diamond grinding?

It should. Any professional quote for epoxy flake flooring in Melbourne should include diamond grinding as a standard part of the preparation. If it doesn’t, ask specifically whether grinding is included before signing.

How many flake colours can I choose from?

Most Melbourne installers offer dozens of colour blends. Metal and Flake carries a premium flake range in standard and custom blends. The colour mix doesn’t significantly change the installed cost.

How long does the floor last?

A professionally installed epoxy flake floor in a Melbourne garage typically lasts 10–20 years with basic maintenance. The main factors are preparation quality and topcoat specification. Floors installed without proper grinding or using low-solids products tend to start delaminating or yellowing within 2–5 years.

Get a quote for your Melbourne garage

The most accurate price comes from having an installer assess your concrete in person. Metal and Flake provide free on-site quotes across Melbourne with a full written breakdown. Book your free quote here and know exactly what you’re paying before any work begins.

Ready for a Floor That Lasts?

Get a free, no-obligation quote from Melbourne’s trusted epoxy specialists.

Get a Free Quote
+61 485 031 001

Epoxy Garage Floor Cost in Melbourne: 2026 Price Guide

Family owned & operated · Melbourne & surrounds · Call us free: +61 485 031 001
Epoxy Garage Floor Cost in Melbourne: 2026 Price Guide

Epoxy Garage Floor Cost in Melbourne: 2026 Price Guide

Back to Blog

If you’re budgeting for an epoxy garage floor in Melbourne, you’ve probably noticed that quotes vary wildly. One installer says $2,000, another says $5,500, and neither one explains why. This 2026 price guide breaks down the real epoxy garage floor cost in Melbourne by system type, floor size, and concrete condition, so you know exactly what you’re paying for before anyone picks up a grinder.

Key takeaways

  • Epoxy garage floor cost in Melbourne ranges from $60 to $160 per m² installed, depending on the system and prep required.
  • A standard double garage (36–40 m²) typically costs $2,500 to $4,500 all in.
  • Concrete preparation, not floor size, is the biggest variable in your final price.
  • Epoxy flake floors sit at $80–$120/m². Metallic epoxy runs $100–$160/m².
  • A cheap quote that skips diamond grinding almost always means a floor that peels within two years.

Epoxy garage floor cost per m² in Melbourne: 2026 price table

Here’s what Melbourne homeowners are paying in 2026, broken down by system type:

System type Cost per m² (installed) Best for
Basic single-coat epoxy $30–$50/m² Budget workshops, rental properties
Standard 2–3 coat epoxy $60–$90/m² Functional garages, light vehicle storage
Epoxy flake flooring $80–$120/m² Garages, showrooms, residential laundries
Metallic epoxy flooring $100–$160/m² Statement garages, home gyms, feature floors
Heavy-duty industrial epoxy $90–$150/m² Commercial workshops, warehouses

These prices include diamond grinding preparation, primer, the system coats, and a polyurethane or polyaspartic topcoat. They do not include crack repairs, moisture remediation, or significant levelling work. Those add cost if your slab needs them.

What does an epoxy garage floor cost for a standard Melbourne garage?

Most Melbourne residential garages fall into one of three size brackets. Here’s what you can expect to pay in each:

Single garage (18–24 m²)

A single garage epoxy floor in Melbourne costs between $1,400 and $2,900 for a flake or standard system. Note that most professional installers carry a minimum call-out of $1,200–$1,500, so small garages pay a slight premium on a per-m² basis.

Double garage (36–44 m²)

A double garage is the sweet spot. Most Melbourne homeowners pay $2,800 to $4,500 for an epoxy flake system in a standard double garage. A metallic epoxy finish on the same floor runs $3,600 to $6,000 depending on the complexity of the design.

Triple garage or large slab (55–80 m²)

At this scale the per-m² rate drops slightly as preparation and mobilisation costs spread across a bigger area. Budget $4,400 to $9,500 for a quality flake or metallic finish on a large slab.

What actually drives the price of your epoxy garage floor?

Two quotes on the same size garage can differ by $2,000 or more. These are the four factors that explain why:

1. Concrete preparation

This is the single biggest variable. Diamond grinding opens the concrete pores so the epoxy bonds properly. If your slab has oil stains, failed paint, moisture issues, or a trowelled hard finish, preparation takes longer and costs more. Expect grinding to add $15–$25 per m² to the base rate. It’s not optional if you want the floor to last.

A quote that doesn’t mention preparation at all is a red flag. It either means they’re skipping it (bad) or burying it in the total without disclosing it (also bad).

2. Concrete condition

Cracks, spalling, and moisture transmission each add scope. A hairline crack might cost $80–$150 to fill. Widespread spalling or a slab that’s wicking moisture can add $500–$1,500 to the job before the epoxy goes down. A good installer will tell you about these during the quote, not surprise you mid-job.

3. System type and number of coats

A basic two-coat system uses less product and less labour than a full metallic epoxy system with a broadcast flake layer and two topcoats. The more layers and the more premium the product, the higher the material cost. Metallic epoxy uses more specialist product and takes longer to lay correctly, which is why it sits at a higher price point than standard flake.

4. Access and layout

A garage that’s easy to get a grinder into, with straight lines and no built-in cabinetry to work around, costs less than one with tight corners, floor drains, step edges, or integrated shelving. If your garage has structural pillars or a laundry section, expect a small uplift.

Epoxy flake vs metallic epoxy: cost comparison for Melbourne garages

These are the two most popular premium systems in Melbourne residential garages. Here’s how they compare on price and outcome:

Epoxy flake Metallic epoxy
Cost per m² $80–$120 $100–$160
Double garage (40 m²) $3,200–$4,800 $4,000–$6,400
Visual result Textured, multi-colour chip finish Liquid marble, 3D depth effect
Slip resistance Excellent (texture from chips) Good (topcoat can be made anti-slip)
Hides imperfections Very well Moderately
Curing time Light use in 24h, full cure 7 days Light use in 24h, full cure 7 days

If your concrete has minor pitting or surface variation, the flake system hides it better. If you want a feature floor that looks like polished marble, metallic epoxy is worth the premium.

How to read an epoxy flooring quote in Melbourne

A legitimate quote should always specify these items in writing:

  • Surface preparation method: diamond grinding, shot blasting, or acid etching (grinding is the industry standard for residential)
  • Number of coats: primer, base coat(s), and topcoat as separate line items
  • Product brand and specification: commercial-grade epoxy has a higher solids content than DIY products
  • Crack filling: whether minor crack repairs are included or quoted separately
  • Topcoat type: polyurethane or polyaspartic (polyaspartic cures faster and handles UV better)
  • Warranty terms: a quality installer typically offers 5–10 years on workmanship

If a quote is a single line item with no breakdown, ask for detail before you sign anything. The cheapest quote on a per-m² basis is often the one that skips preparation or uses a low-solids product that won’t last.

DIY epoxy vs professional installation: the real cost difference

DIY epoxy kits for a double garage run $300–$800 from hardware stores. Professional installation runs $2,800–$4,500 for the same space. That’s a $2,000–$3,700 gap. So why do most Melbourne homeowners choose a professional?

The short answer: DIY epoxy uses water-based systems with around 50% solids content. Professional systems use 100% solids commercial-grade epoxy. The performance difference is significant. DIY floors typically last 3–5 years before peeling or yellowing. Professional floors last 10–20 years with basic maintenance.

The other issue is preparation. Hiring a concrete grinder for a weekend costs $200–$350. Most DIYers skip this step or use acid etching instead, which doesn’t open the pores deeply enough. The result is a floor that looks good for 12 months and then starts delaminating from the edges.

If you’re considering DIY to save money, the calculation only works if you’re comfortable accepting a 3–5 year lifespan and potentially doing it again.

Does the type of topcoat affect the price?

Yes. There are two common topcoat options for Melbourne garage floors:

  • Polyurethane topcoat: the standard option, durable and cost-effective. Adds approximately $8–$12/m² to the total.
  • Polyaspartic topcoat: faster curing (can drive on it in hours rather than days), better UV resistance, and more flexible. Adds approximately $15–$25/m². Worth considering for garages with direct sun exposure or if you need the garage back in use quickly.

How to get an accurate epoxy garage floor quote in Melbourne

To get a quote that reflects your actual job, have these ready when you contact an installer:

  • Approximate floor area in m² (length x width, subtract built-in benches or shelving)
  • Photos of the concrete surface, cracks, stains, or any previous coatings
  • Whether the garage gets direct sun or is enclosed
  • Your preferred system (flake, metallic, or standard)
  • Timeline, whether you need the garage back by a certain date

Most reputable Melbourne epoxy flooring companies offer a free on-site measure and quote. An in-person quote is more accurate than a phone estimate because the installer can assess the concrete condition directly.

FAQ: epoxy garage floor cost Melbourne

How much does it cost to epoxy a double garage floor in Melbourne?

A double garage (36–44 m²) with an epoxy flake system costs approximately $2,800–$4,500 in Melbourne in 2026, including preparation and topcoat. A metallic epoxy finish on the same floor typically runs $4,000–$6,400.

What is the cheapest epoxy option for a Melbourne garage?

A basic two-coat epoxy system without decorative finish starts at around $30–$50/m², or $1,100–$2,000 for a double garage. This won’t give you a premium look, but it will protect the concrete and is a significant upgrade over bare concrete or floor paint.

Does the price include concrete preparation?

It should. Any quote that doesn’t mention preparation, specifically diamond grinding , is either excluding it (which will cause the floor to fail) or skipping it entirely. Always confirm that grinding is included before signing.

How long does epoxy garage floor installation take in Melbourne?

Most residential garages are completed in one to two days. The floor needs 24 hours before light foot traffic and 5–7 days before you can park a vehicle on it. Polyaspartic topcoats cure faster. Some allow vehicle traffic within 24 hours.

Will the price go up if my concrete has cracks or stains?

Possibly. Oil stains require degreasing treatment before primer goes down. Cracks need to be filled and feathered. These are usually minor additions ($80–$400 depending on extent), but a good installer will flag them at quoting rather than add them to the invoice mid-job.

Is epoxy flooring worth the cost for a Melbourne garage?

For most homeowners, yes. A quality epoxy floor lasts 10–20 years, is easy to clean, resists oil and chemicals, and adds visible value to the property. The cost per year of service life compares well against alternatives like tiles or polyurethane paint.

Get an accurate price for your Melbourne garage

Every garage is different. The best way to get a real number for your job is to have an installer look at your concrete in person. Metal and Flake offer free on-site quotes across Melbourne. get in touch to book yours and get a detailed breakdown before you commit to anything.

Ready for a Floor That Lasts?

Get a free, no-obligation quote from Melbourne’s trusted epoxy specialists.

Get a Free Quote
+61 485 031 001