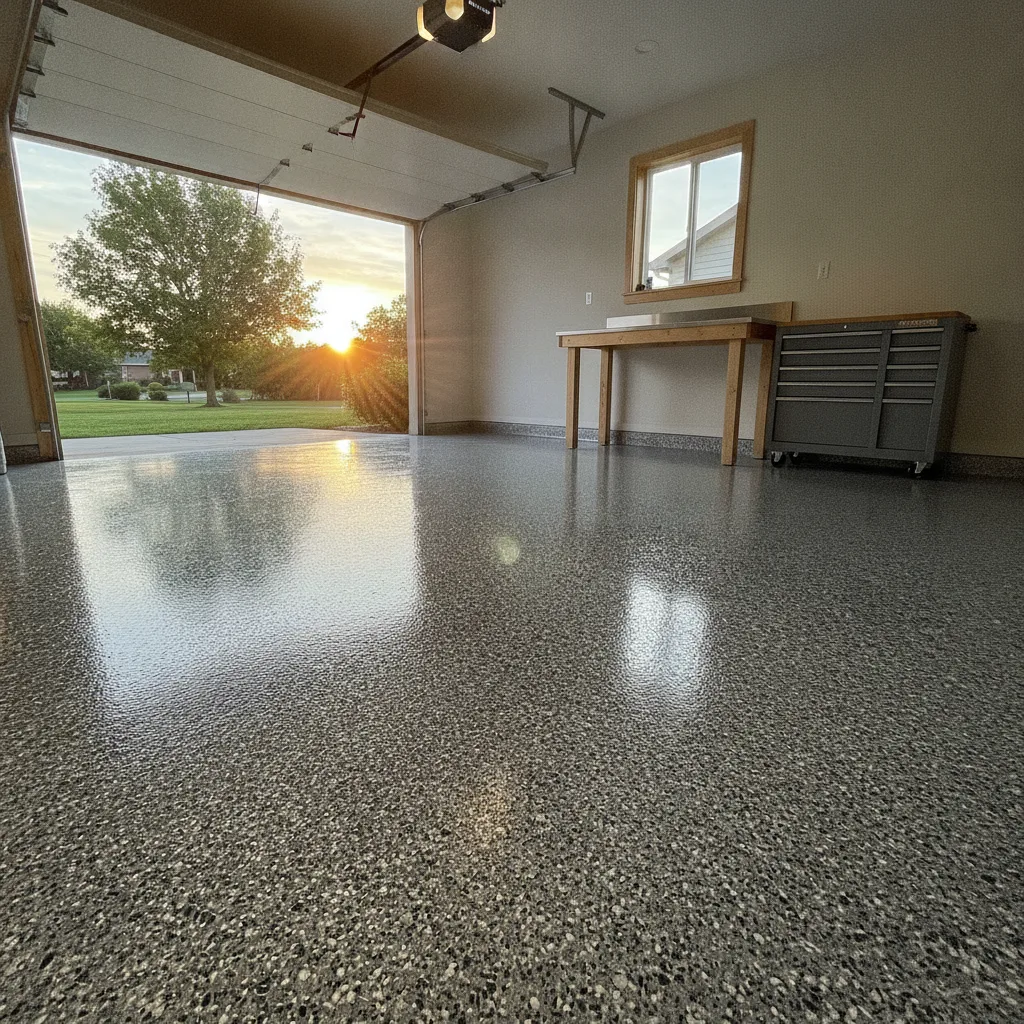
Garage Makeover: How to Transform Your Space with Epoxy Flooring
A garage makeover with epoxy flooring turns a cracked, oil-stained concrete slab into a durable, easy-to-clean surface that looks the part for years. The process covers surface preparation, choosing the right coating system, and applying a hard-wearing finish. Done properly, an epoxy floor resists chemicals, heavy foot traffic, and rolling vehicle loads without peeling or fading.
Why is epoxy flooring the go-to choice for a garage makeover?
Epoxy flooring is the go-to choice for a garage makeover because it bonds directly to concrete, creating a surface that is two to three times harder than the raw slab underneath. It handles hot tyre contact, spilled oil, and constant foot traffic without breaking down. It also reflects light well, which instantly makes a dark garage feel bigger and cleaner.
Most Australian garages are poured with a basic structural concrete mix. That mix is porous, meaning oil soaks straight in, water sits on it, and dust never really leaves no matter how often you sweep. A quality epoxy system seals that porosity completely. You end up with a surface that wipes clean with a mop rather than needing a pressure washer every time you change the oil.
There is also a visual upgrade that is hard to argue with. Decorative flake systems, for instance, scatter coloured vinyl chips across the wet base coat before a clear topcoat locks everything in. The result looks closer to a showroom floor than a suburban garage, and no two floors come out identical. That matters for homeowners who use the garage as a workshop, a home gym, or an extra entertaining space, not just somewhere to park the car.
What does the preparation process look like before a garage makeover?
Before a garage makeover can begin, the concrete slab must be mechanically prepared, usually by diamond grinding, to open the surface profile so the epoxy bonds correctly. Any existing paint, sealers, or contamination need to be fully removed. Cracks and spalling are filled and allowed to cure. Skipping or rushing this step is the single biggest reason epoxy floors fail prematurely.
Surface preparation is not glamorous work, but it is where the quality of the finished floor is actually decided. A floor that has been diamond ground to the right profile, CSP 2 to CSP 3 on the International Concrete Repair Institute scale, gives the epoxy mechanical anchor points that adhesion alone cannot replicate. A floor that has just been acid etched and swept clean might look ready, but the bond strength is significantly lower and delamination becomes a real risk within a few years.
Moisture is another thing to take seriously. Concrete slabs in Melbourne’s climate can carry residual moisture from below the slab, especially in older homes without a proper moisture barrier. Applying an epoxy coating over a damp slab traps that moisture, and the pressure eventually pushes the coating off from underneath. A quick calcium chloride test or a professional moisture reading before coating saves a lot of grief later.
Once the slab is clean, dry, and profiled, any cracks wider than a hairline are filled with a rigid epoxy filler or a flexible polyurethane compound depending on whether the crack is structural or just a shrinkage crack. Only after all of that is sorted does the first coat of epoxy go down.
How many coats does a proper garage makeover epoxy system need?
A proper garage makeover epoxy system typically needs at least three coats: a penetrating primer or base coat, a colour coat where decorative flakes are broadcast, and a clear polyurethane or polyaspartic topcoat. Two-coat systems exist but sacrifice durability. A three-coat system applied at the correct film thickness, usually around 400 to 600 microns total, is what gives the floor its long-term performance.
The base coat is the workhorse. It soaks into the prepared concrete and creates the chemical bond that holds everything above it in place. The colour coat builds the body of the floor and carries the decorative element. If you are going with a flake system, the chips are scattered by hand across the wet colour coat, sometimes to full rejection, meaning you keep throwing chips until the surface can hold no more. Once cured, excess chips are scraped back and the surface is lightly sanded before the topcoat goes on.
The topcoat is what you actually walk and drive on every day. Polyaspartic topcoats, a newer option compared to traditional urethanes, cure faster and offer excellent UV stability, which matters if your garage door is open for hours on end and direct sunlight hits the floor regularly. UV-stable topcoats hold their colour and gloss for years rather than yellowing within twelve months the way some older epoxy formulations would.
The time between coats matters too. Recoating too soon, before the previous layer has reached its minimum cure window, causes intercoat adhesion failures. Recoating too late can mean you need to mechanically abrade the surface again to get a fresh bond. Professional applicators work to the product data sheet rather than guessing, which is one reason the results are consistently better than DIY kit applications.
How long does a garage makeover with epoxy actually last?
A professionally applied garage epoxy system in a residential setting typically lasts ten to twenty years with basic maintenance, assuming the preparation was done correctly and a quality topcoat was used. High-traffic areas may show minor scuffing sooner, but spot repairs are straightforward. Cheap DIY kits with thin single-coat applications tend to peel within two to three years, which is where most bad epoxy stories come from.
Maintenance is about as simple as a floor gets. A regular sweep to clear grit, which acts like sandpaper under tyres and boots, and a occasional mop with a pH-neutral cleaner is genuinely all it takes. Hot tyre pick-up, the tendency for tyres to soften a coating when the car is parked hot and then pull it up when it moves off, is avoided by using a topcoat with sufficient heat resistance rather than a basic water-based epoxy.
One realistic thing to keep in mind: epoxy is hard but not indestructible. Dropping a sharp steel object from height, a vice or a steel shelf bracket for example, can chip the surface. Those chips are repairable, but they are a feature of any hard-surface floor, not a defect unique to epoxy. Overall, the durability-to-cost ratio of a professionally coated epoxy floor stacks up extremely well against tiles, rubber mats, or painted concrete.
What should you look for when choosing a garage floor coating contractor?
When choosing a garage floor coating contractor, look for someone who uses mechanical surface preparation rather than acid wash only, can show you completed residential projects in your area, specifies the exact products and film thickness they will apply, and provides a written warranty on both labour and materials. A contractor who skips the detail on preparation and products is one worth walking away from.
Ask to see photos of floors they have done at least twelve months ago, not just freshly finished work. A coating that looks sharp on day one but begins to peel or yellow within a year tells you more about quality than a glossy photo taken at completion. References from real homeowners in Melbourne and surrounds are worth chasing up.
Product transparency matters. Any professional should be comfortable telling you exactly which epoxy primer, colour coat, and topcoat brand and product line they are using. That lets you cross-check the technical data sheet to confirm the products are genuinely rated for a vehicular garage environment, not a light-duty commercial or interior residential application repurposed for the job.
A garage makeover is a meaningful investment, typically several thousand dollars for a standard double garage. Getting the right contractor makes the difference between a floor you are proud of a decade from now and one you are peeling up and redoing in three years.
Book a residential garage floor coating with Metal and Flake